Monday, February 19, 2018

Well if you are iOS Developer with the swift starter as knowledge or you are coder that want to know the basic of objective-c view,  this post is suitable for you.  I will explain about anatomy of objective-c, encapsulation, and instance variable vs obj-c properties, setter getter on objective-c. I hope this post will help you to understand the basic of objective c. this post also suitable with you who want to start learning objective c.

  • Anatomy of Objective-C

    Basically when you create a objective-c class (cocoa class)  you will got two file, they are .h file extensions class and .m file extensions class. two classes is represents of objective-c class. each of them have different and specifics purpose.
    The .h file is a header file, this file purpose is for the definition and identity of the class and to send information to the world. if you want to put property or method which open and accessed in the world (other classes) you should put that property here , that's the jobs of the header file.
the .m file is implementation file, this file purpose is doing implementation in the class, so you can put and do your  private instance, private method logic and implementation from  the header here.
Picture 1. Class structure (obj-c vs swift)

  • Encapsulation

Encapsulation is one of the oop (object oriented programing) concept, the simple definition is when you need to hiding or showing some of your instance, field, method to other classes or package. you can check here if you need detail explanation about it check here Encapsulation.
As I mention before in the anatomy of objective-c that the header file is for showing to the world and .m is for implementation. basically thing that I could say is :

    • .h file = public property, public method, instance variable
    • .m file = private instance, private method, and implementation from header file.

  • Objective c properties vs Instance variable.

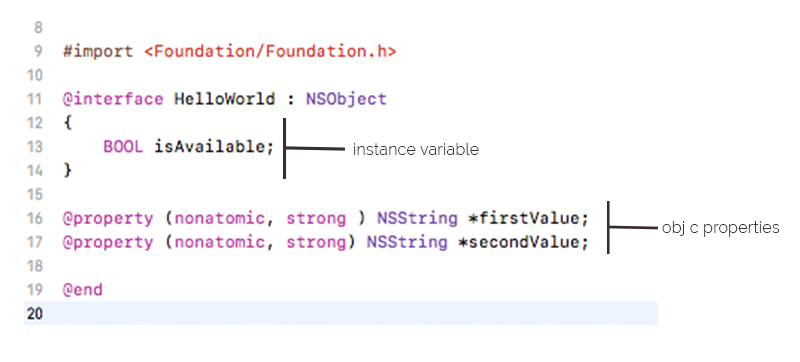
In objective c there are two type of field, they are objective- c properties and instance variable. each them have different usability.
here the example of instance variable vs objective c properties


Picture 2 . Instance Variable & Objective C


By default when you create objective-c properties on your header file, that's automatically create three element. they are instance variable, setter, getter.
    • Instance variable
As you can see before the instance variable found on the bracket on header file. the thing you should to know is when you create objective c properties you created also hiding instance variable. and then you can access that on the implementation class with underline before the name like this.
Picture 3. Accessing instance variable on implementation class

    • Setter and getter
And by default every objective c properties automatically generate the setter and getter method. you can access like this on other classes.
Picture 4. Accessing setter and getter method of obj-c properties


The next question is, where I should use instance variable or using objective-c properties as variable. not all developers do this (will do all with objective-c properties) , but good developers know how to do this well. so if you are gonna access that field only on the implementation class use instance variable, and if you want to access it in other classes use objective-c properties.

That's all my short tutorials and basic things that you should know about objective C. I'll explain more on the next tutorial if possible, if you feel this tutorials help you feel free to share. thanks!

Thursday, January 18, 2018


Today I would like to give you an examples how to create games like flappy bird using unity.  you can play here for the final result of the game flappyfroggame. The starter project you can download here FlappyFrogStarterProject. I use unity 5.6.4, you can use same version as me or later. I made some separated main task for creating this games. here they are :
- scrolling and infinite background
- jumping bird , gravity , Touch Input
- obstacle generator
- collision, game over & restart game

lets make the games.

Scrolling and invinite background


1. Make GameManager
Firstly is make the GameManager object, this object contains the whole game states, instance and manager of the games.
to create new object "command + shift + n".  then create your script GameManager.cs . then attach it on the object.
GameManager.cs

       
using System.Collections;
using System.Collections.Generic;
using UnityEngine;

public class GameManager : MonoBehaviour {
	public GameObject Bird;
	public GameObject GameOver;
	public bool IsGameOver;
	private bool isGameOverAdded;
	// Use this for initialization
	void Start () {

	}
	
	// Update is called once per frame
	void Update () {
		if (IsGameOver) {
			if (!isGameOverAdded) {
				GameObject.Instantiate (GameOver);
				isGameOverAdded = true;
			}
		}
	}

on the GameManager.cs I made field for Bird and GameOver object. and flag for gameover and pop up window of gameover.
on method Update() check the state of current game, if the state is IsGameOver than add GameOverObject to the screen.

2. Make Background Object and animate it
on this step we are gonna create endless moving background. Create 3 new GameObject than assign sprite renderer component, then select  Background.png as Sprite. so now you have 3 background object for endless animating.
Now Create new Script "BackgroundEndlessAnimate.cs" then animate your background here


using System.Collections;
using System.Collections.Generic;
using UnityEngine;

public class BackgroundEndlessAnimate : MonoBehaviour {
        //please assign the background object in inspector panel the background
	public GameObject[] Backgrounds;

	public float MoveSpeed;
	public GameManager gameManager;

	//left & right border value got from width of the background
	private float leftBorder = -19.2f;
	private float rightBorder = 38.4f;


	// Use this for initialization
	void Start () {
		
	}
	
	// Update is called once per frame
	void Update () {
		if (!gameManager.IsGameOver) {
			//animate background
			Backgrounds[0].transform.position = new Vector3 (Backgrounds[0].transform.position.x - MoveSpeed, 0f,0f);
			Backgrounds[1].transform.position = new Vector3 (Backgrounds[1].transform.position.x - MoveSpeed, 0f,0f);
			Backgrounds[2].transform.position = new Vector3 (Backgrounds[2].transform.position.x - MoveSpeed, 0f,0f);

			//check for border left and assign to right
			foreach(var bg in Backgrounds)
			{

				if (bg.transform.position.x <= leftBorder) {
					bg.transform.position = new Vector3 (rightBorder, 0.0f, 0.0f);
				}
			}
		}

	}

}

Assign this script as component on the GameManager object. then assign the background that you made to the inspector panel. the length of the background object array should 3. and the last is set the value of movespeed, set this to 0.04.

Try Run the Project, if everything going well your background should moving from right to left endlessly.

Jumping Bird and Gravity

1. Gravity System
I made my simple gravity system. Create Bird Object within sprite renderer component and bird.png as sprite. then create script BirdGravity.cs. create public float field for Gravity, then on Update() method write this

       
if (!gameManager.IsGameOver) {
	this.transform.Translate (new Vector3 (0.0f, Gravity, 0.0f));
}
 attach the script to the Bird object then set value of the Gravity on the inspector panel.

2. Add Touch Input object
Create new object called TouchObject, this object will listen your tap on the screen. please add BoxCollider component in the TouchObject and set height and width of collider based on your screen size (the collider cover all area on the screen).

3. Jumping System
Create Jumping Script "BirdMove.cs"


public class BirdMove : MonoBehaviour {
	public GameManager GameManager;
	public float JumpValue;

	private const float JUMPTIMEVAL = 8f;
	private bool isJump = false;
	private float jumpTime;
	// Use this for initialization
	void Start () {
		jumpTime = JUMPTIMEVAL;
	}

	void OnMouseDown(){
		if (!GameManager.IsGameOver) {
			isJump = true;
		}
	}

	// Update is called once per frame
	void Update () {
		if (!GameManager.IsGameOver) {
			if (isJump && jumpTime >= 0.0f) {
				GameManager.Bird.transform.Translate (new Vector3 (0.0f, JumpValue, 0.0f));
				jumpTime--;
			} else {
				isJump = false;
				jumpTime = JUMPTIMEVAL;
			}
		}
	}
}

Jumpvalue is for set height of jumping the bird, and the rest jumping logic is in the update() method. assign this script to the TouchObject. then attach the public field to every object.

Try Run the Project, if everything going well the bird will fall down and when you tap in the screen the bird will jump.

Obstacle Generator

lets continue make the obstacle, as we know the flappy bird will game over when the bird hit the green tube in top and bottom. so we will create those object and the generate system.

1. Create obstacle prefabs
create new object called obstacle which contain two of child bottom obstacle and top obstacle and on each child assign boxcollider and rigidbody for component. please set IsTrigger to checked on inspector panel. then save the object as prefabs.

2. Create Generate Obstacle System
create new script "ObstacleGenerator". this script will attached to GameManager object. here the script


public class ObstacleGenerator : MonoBehaviour {
	public GameObject Obstacle;
	public int CountGenerate;
	public float DistanceX;
	public float MaxPosY;
	public float MinPosY;
	// Use this for initialization
	void Start () {
		GenerateObstacle ();
	}

	// Update is called once per frame
	void Update () {
		
	}

	void GenerateObstacle()
	{
		for (int i = 0; i < CountGenerate; i++) {
			GameObject newObstacle =  GameObject.Instantiate (Obstacle) as GameObject;
			float posY =  Random.Range (MinPosY, MaxPosY);
			newObstacle.transform.localPosition = new Vector3 (i * DistanceX, posY, -10.0f);
		}
	}
}


and then set this value on the inspector panel of ObstacleGenerator Component.
Obstacle = Obstacle prefab,
CountGenerate = 13,
DistanceX = 4.5,
MaxPosY = 0.8,
MinPosY = -0.5.

3. Animating and moves the Obstacles
create "ObstacleMove.cs" component then attach it on the obstacle prefabs. here the script


public class ObstacleMove : MonoBehaviour {

	public float MoveSpeed;
	private const float LEFTBORDER = -19.2f;
	private const float RIGHTBORDER = 38.4f;
	private GameManager gameManager;
	// Use this for initialization
	void Start () {
		gameManager = GameObject.Find ("GameManager").GetComponent ();
	}

	// Update is called once per frame
	void Update () {
		if (!gameManager.IsGameOver) {
			transform.Translate( new Vector3 ((MoveSpeed * -1),0f,0f));

			if (transform.localPosition.x <= LEFTBORDER)
				transform.localPosition = new Vector3 (RIGHTBORDER,transform.localPosition.y,-10.0f);
			
		}

	}
}

the Update() method contains logic for moving the obstacle and give the border/limit when reach the edge of the background, it will move to the far right of the background.
set the  ObstacleMove component of the prefab in inspector panel
MoveSpeed = 0.1

Try Run the Project, if everything going well, the obstacles will generated and automaticly moving from right to left endlessly.


Collision

1. Get the Collision Event
Now lets get the collision event between the Bird and the Obstacle. first thing is create PlayerManager script that used to save the state, or others field needed for the player. this script is used to receive collision state with the obstacle (tube).  on this script we just need GameManager instance. and the concept is when the bird got collide, PlayerManager will set GameManager.IsGameOver to true.
here the script of PlayerManager.cs

       
//assign gameManager here
public GameManager gameManager;

void OnTriggerEnter(Collider col){
        //got collide and then set gameover state
	gameManager.IsGameOver = true;
}
OnTriggerEnter() will invoked when the bird got collide with others object contain collider, since there are no others object contain collider except the obstacle so we can set the gameover state here.

2. Add GameOver Object
The concept is when the user tap this gameover tittle the game will restart. so lets make the GameOver object.
Create New Object which contain Sprite Renderer and gameover.png as sprite. then add Boxcollider on the GameOverObject.
Then make GameOver.cs for restarting the game when tap the object. here the script


void OnMouseDown()
{
	SceneManager.LoadScene (0);
	GameObject.Find ("GameManager").GetComponent ().IsGameOver = false;
}


and if you see at the top of this article you can check in GameManager.cs, look at this line


void Update () {
	if (IsGameOver) {
		if (!isGameOverAdded) {
			GameObject.Instantiate (GameOver);
			isGameOverAdded = true;
		}
	}
}
this line was indicated that  the GameManager will add GameOver Object when the IsGameOver == true.
Also don't forget to assign the public GameOver object on the GameManager Component.

Try Run the Project, if everything going well, the game over object will show when the bird hit the obstacle (tube).

that's all the for basic games like flappy bird logic tutorial, you can add your scoring system, sound, animating system by yourself. please don't forget to comment if you have questions about this tutorials.

here are the complete project FlappyFrogComplete.


Friday, September 15, 2017

    The little thing that bothering me when importing an existing XAML file with code behind class to the Visual Studio / Xamarin Studio is the file will be separated with the code behind. of course it will made the project cannot be compiled because of the InitializeComponent() cannot execute in the code behind class. I didn't know why VS/XS not knowing the file as a one entity. so how to fix it, you just need to do some of simple step.

First one is you have to make a new class with the same name as the imported class name, and then select add existing file”. here the step with the screenshots.


Step 1 Add your XAML file and code behind class

as you can see that the file that you are import is separated became two, XAML file and .CS file.
Step 2 Make a new file with the same name


Step 3 Select “add existing file” twice for XAML file also for codebehind
Congratulation you have successfully fix it. simple right?

Tuesday, August 8, 2017


When you are on developing android apps, and looking for the way how to push your code on github repository for the first time easily. then you are came to the right place. I will show you how to do it.

There are many outside explained how to push your code on the github, but this way I just wanna show you “the basic way”,if you are an expert enough with github, this tutorial may not suited with you. but if you are first time, very beginner, and never do it before, and not want to spend much time to do it this is very usefull & handfull tips. if you are not really familiar with github maybe you need to know about version control explanation, about the benefit of using it and the concept. you can read here in github page guide https://guides.github.com/activities/hello-world/.

Also there are some of rule that github restricted you to do, like providing the API key of your project to the public repository and other. you can check on here for more explanation about that https://help.github.com/ and  https://help.github.com/articles/restricting-access-to-your-organization-s-data/. 

Tools Required :
1. android studio
2. github account

So lets start.

First, if you dont have github account, create it!
then open your android studio 
open your project 
click on the toolbar - VCS -import into version control - share project on github


If you are never push any project to your github account before you need to filling forms for login in github, otherwise you just need to create new repository name, the name of repository will be your url-project location for example would be like this https://github.com/baskoroajis/Stage2.


Then you need to add your files to your initial commit, make sure to check mark all files you need to send to the repository. also you can write message for the initial commits, this message will help you to find specific description in your commits in the future.


And the final step is you just need to wait for the upload proses (look at the bottom of your android studio for the proses), then check your github account for making sure the project has been added to your account.

Sunday, July 9, 2017

You may think that creating notification badge is difficult things on iOS. but this is very simple step how to configure this. I will explain how to create notification badge for your apps. lets start.


First step is setting up permission,  you need to write this on your Appdelegate file. write this on the  
didFinishLaunchingWithOptions method called.

       
//Swift 3
let types:UIUserNotificationType = UIUserNotificationType.badge;
let notificationSettings:UIUserNotificationSettings = UIUserNotificationSettings(types: types, categories: nil)
UIApplication.shared.registerUserNotificationSettings(notificationSettings)

       
This used for giving permission for your apps to allow for showing notification badge.

And the only last and left thing is set the notification badge count. write this code for updating the count of badge.


//Swift 3
UIApplication.shared.applicationIconBadgeNumber = 5


You can place the code on the where you must change the notification count.

Then launch your apps, first you will got pop up for allowing the apps to give you notification (you only got this pop up once).


Then, back to your home and look at your icon apps.


Congratulation, you've success implemented notification badge for your apps. simple right?

Also for the usual iOS apps,  implementing the notification badge is following with the push notification, so the idea is notification badge count will be changed after got new push notification, but not limited to this. on this article I only explain about how to create and change the notification badge. maybe in the future article I will explain for push notification. Thank you!

Monday, June 19, 2017


When you are new on the xamarin development, one of the confusing line is when you got wrong XAML syntax's but there is not really clear on the  which line of your code occurred the errors. this caused by default setting of XAML xamarin syntax will be compiled at the run time, not at the build time, so you will only got your apps force close unexpectedly and got not so clear about the errors. this is very confusing for early xamarin developers. I will give the example and the solution how to fix this. I am using visual studio for mac and this could be same steps in xamarin studio.

here the example:
first I made a random wrong XAML syntax for testing purpose, you can do write random wrong code too. and then if I tried to build the project there would be no problem until we run the apps and came to the error page (error page must be as presenter which means occurrence show page).

and then got this errors.


as you can see there is not really clear about the errors (you must search manually the class and the line of code), this is very bothering especially for early xamarin developers.

so for handle this you must edit the assembly option of your project. this is very simple step, you only have to add one line of code on the class AssemblyInfo. go to class AssemblyInfo.cs in the properties folder.


then add this line :
[assembly: XamlCompilation(XamlCompilationOptions.Compile)]

don't forget to add namespace by  using Xamarin Forms Xaml namespace, write this on the top-line of the class :
using Xamarin.Forms.Xaml;

Here the complete source code of AssemblyInfo.cs


using System.Reflection;
using System.Runtime.CompilerServices;
using Xamarin.Forms.Xaml;
// Information about this assembly is defined by the following attributes. 
// Change them to the values specific to your project.

[assembly: AssemblyTitle("Section7")]
[assembly: AssemblyDescription("")]
[assembly: AssemblyConfiguration("")]
[assembly: AssemblyCompany("")]
[assembly: AssemblyProduct("")]
[assembly: AssemblyCopyright("${AuthorCopyright}")]
[assembly: AssemblyTrademark("")]
[assembly: AssemblyCulture("")]

// The assembly version has the format "{Major}.{Minor}.{Build}.{Revision}".
// The form "{Major}.{Minor}.*" will automatically update the build and revision,
// and "{Major}.{Minor}.{Build}.*" will update just the revision.

[assembly: AssemblyVersion("1.0.*")]
[assembly: XamlCompilation(XamlCompilationOptions.Compile)]

// The following attributes are used to specify the signing key for the assembly, 
// if desired. See the Mono documentation for more information about signing.

//[assembly: AssemblyDelaySign(false)]
//[assembly: AssemblyKeyFile("")]


And now if you build the project, the XAML will thrown an error on build time. like this :

and now you can see on the which line of code and class the errors has occurred, and if you double click the errors-line it will guide you to the error-class.

So finally it is your choice about the compilation. but for myself I am preferred to set this on the build time, not only for more clearly about the errors code, but it also prevent from missed errors line on your code that can caused force close unexpectedly on your apps in the future.

Hope this article help you!

Contact me

Name

Email *

Message *